When developing a Django web application, you normally use
python manage.py runserverto start the built-in Django web server and run it on the default port of 8000. This development server automatically restarts when code changes, and is easy to run without any configuration. This is perfect for a development server, so if you’re looking to get up and running with Django, use the development server. The downside of using this server is that it is not built for production. It is slow, and it cannot handle many requests at a time.
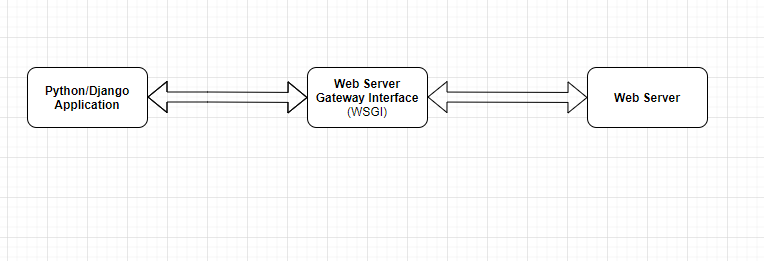
To deploy your web application to production you need a production ready Web Server like Apache or NGINX. These web servers typically cannot communicate with Python applications directly. So the first step is to install and configure a WSGI server. The Web Server Gateway Interface (WSGI) is a standard for allowing web applications written in Python to communicate with HTTP Web servers.
Gunicorn is an example of a WSGI server. In this article I will show you how to install, configure and run gunicorn with a Django application.
Virtual Environment
The first step is to setup your environment by creating a virtual environment and installing Django and Gunicorn. I use Linux and my favourite way to create a virtual environment is to use the built in venv module:
$ sudo apt-get install python3-venv
$ python3 -m venv .venv
$ source .venv/bin/activate
Once the virtual environment is created and activated, install Django and Gunicorn:
$ pip install django
$ pip install gunicorn
Next, create a new Django project called myproject, note the period(“.”) at the end:
$ django-admin startproject myproject .Now, confirm that you can run the project using the gunicorn server:
gunicorn myproject.wsgiGunicorn takes an argument that is the name of the application it should run. For Django projects, point it to the wsgi file in the project directory. You’ll see output similar to this:
[2021-06-03 21:48:52 +0200] [8618] [INFO] Starting gunicorn 20.1.0
[2021-06-03 21:48:52 +0200] [8618] [INFO] Listening at: http://127.0.0.1:8000 (8618)
[2021-06-03 21:48:52 +0200] [8618] [INFO] Using worker: sync
[2021-06-03 21:48:52 +0200] [8620] [INFO] Booting worker with pid: 8620
Open your browser and navigate to http://127.0.0.1:8000. If everything worked as expected, you should see this familiar screen:

Configuring Gunicorn
In the last section, you saw that it is possible to run gunicorn from the command-line without many arguments. In reality, you will want to run gunicorn with parameters to control things such as logging, debugging, SSL, and the number of workers to use. While it is possible to pass many of these parameters to the gunicorn script at the command-line, it is easier to do this via a configuration file.
To create a gunicorn config file, you can create a directory named config in your project root(same level as manage.py) and in it, create a file with a .py file extension and call it anything you like. The convention is to name it gunicorn.conf.py. This is where you’ll add any valid settings or parameters you want to use to configure the gunicorn server.
I have my project configured this way:
# gunicorn.conf.py

command = "/home/vndlovu/django/.venv/bin/gunicorn"
pythonpath = "/home/vndlovu/django/myproject"
bind = "0.0.0.0:8000"
workers = 3
The first setting, command is a path to the gunicorn executable. Gunicorn gets installed in the virtual environment in the bin folder by default. The next line specifies a path to add to the Python path. This is basically a path to your working directory. The bind setting tells gunicorn what IP and Port it should listen to. You can also bind gunicorn to a unix socket here. The last setting is the number of worker processes that gunicorn should use for handling requests.
Using these new settings, you can now run gunicorn this way:
$ gunicorn -c conf/gunicorn.conf.py myproject.wsgiConclusion
This post showed how to install, configure and serve up applications using gunicorn. Gunicorn is useful for translating HTTP requests into Python but it isn’t enough. In most cases, you would want to have a web server acting as the entrance point to the public. The web server will handle HTTP requests. In the next article in this series, I will show you how to setup the Nginx Web Server.