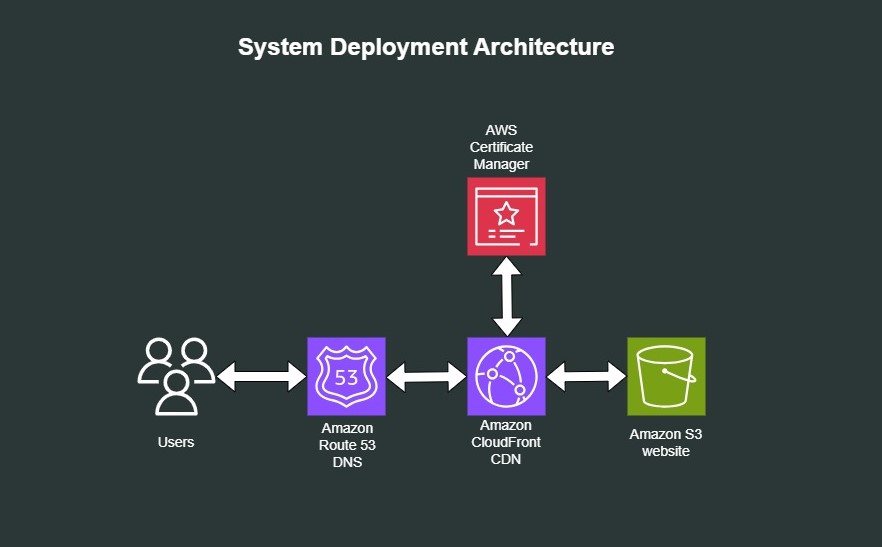
Introduction
A static website is a website that uses only static files like HTML, CSS, JavaScript, images and videos and doesn’t need servers or server-side processing. In this article, I’ll show you how to setup a static website AWS. You’ll see how to:
- Create an Amazon S3 bucket and set it up for static website hosting
- Create DNS records in Amazon Route53
- Set up an Amazon CloudFront distribution and link it with a custom domain
- Secure the connection via SSL/UsersTLS and AWS Certificate Manager
By the end of the article, you’ll have a static website hosted in S3 with DNS records and reachable over HTTPS.
Step 1: Create an S3 bucket
Amazon S3 is a file storage service offered by AWS. In this step, you’ll create a bucket, set it up for public access and upload a website to it.
To create the S3 Bucket:
- Sign in to the AWS management console, search for S3 and select it
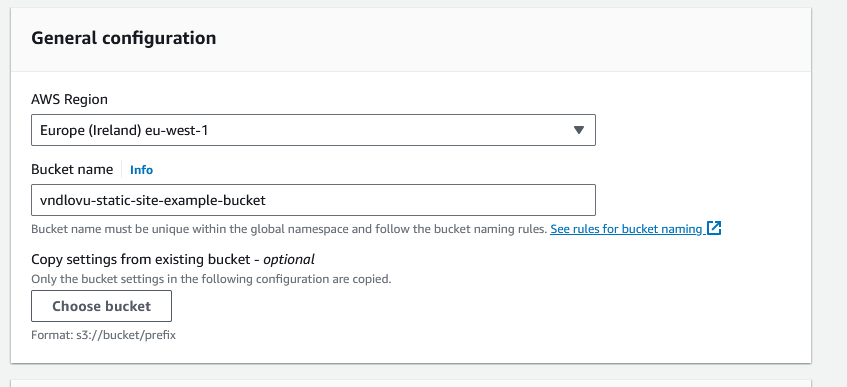
- Click “Create Bucket” and choose a globally unique name for it.
- Choose a region for the bucket.
- Since we want to make this contents of this bucket publicly accessible, uncheck the “Block all public access” box/
- Confirm your selection and create the bucket.
Step 2: Enable static website hosting
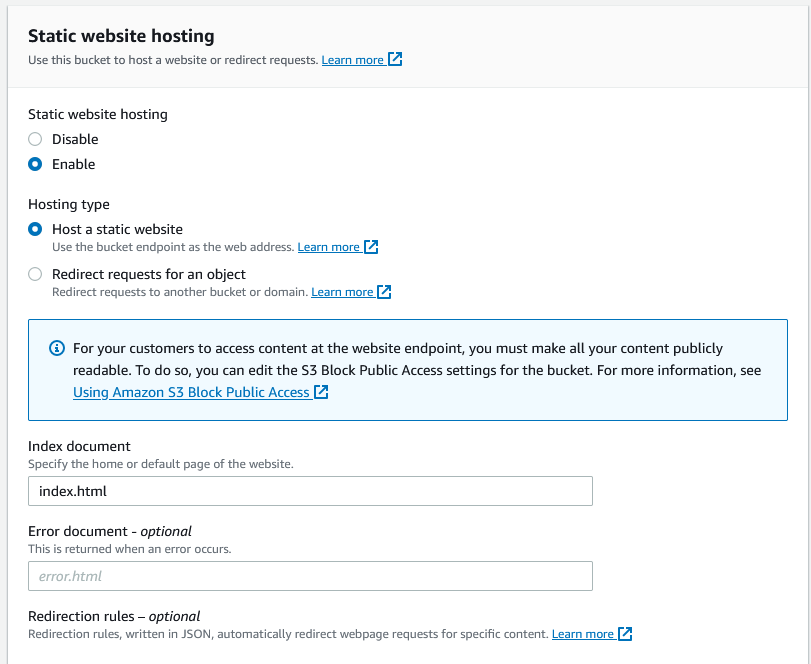
In this section, you’ll see how to configure the bucket for static website hosting as well as configuring an index document. To configure static website hosting do the following:
- Go to the properties of the bucket you just created
- Under Static Website Hosting choose edit
- Choose Use this bucket to host a website.
- Under Static Website Hosting, choose Enable.
- In Index document, enter the file name of the index page(this is usually
index.html). Save your changes. Amazon S3 returns this file whenever requests are made to bucket root. - Under Static Website Hosting, note the endpoint URL. This is the URL of your website. You can’t use this URL yet because the bucket isn’t publicly accessible yet and you haven’t uploaded any files to it.
Step 3: Allow public access to your bucket
AWS blocks public bucket access to buckets by default, so in this section, you’ll allow public access to the bucket. To do this, go to the bucket you created above and:
- Click on the Permissions tab.
- Under Block Public Access (bucket settings) chose Edit
- Clear Block all public access and save changes.
Step 4: Add a bucket policy that makes your bucket content publicly available
In addition to disallowing public bucket access, you have to create an Amazon S3 bucket policy to make the content publicly available. To do this:
- Under Buckets, choose the name of your bucket
- Click the Permissions tab.
- Under Bucket Policy, choose Edit.
- Paste the following policy into the policy editor:
{
    "Version": "2012-10-17",
    "Statement": [
        {
            "Sid": "PublicReadGetObject",
            "Effect": "Allow",
            "Principal": "*",
            "Action": [
                "s3:GetObject"
            ],
            "Resource": [
                "arn:aws:s3:::Bucket-Name/*"
            ]
        }
    ]
}
Update Resource to use the name of your S3 bucket and save the changes. This policy allows anyone to access your website.
Upload website files
For the purposes of this article, I downloaded a dummy website template from free-css.com and uploaded it to an S3 bucket in my AWS account. In the AWS bucket console, click Upload and then Add files and upload the index.html file and any other static assets. The index.html file should be in the root of your bucket.
At this point, the contents of your S3 bucket are now viewable. Click on the S3 bucket URL to see the website you just uploaded.
Setup a custom domain name
The S3 URL isn’t easy to remember and you probably want to use your own domain name for your static website. To point a domain name to your static website you need to purchase a domain from a domain registrar like Amazon Route 53, GoDaddy or Namecheap and set up its DNS records to point it to your website. The steps below assume you want to use Amazon Route 53 to manage DNS. To setup the DNS records do the following:
- Create a hosted zone in Route 53 if you don’t already have one.
- Enter your domain name.
- Create a public hosted zone.
- Add AWS name servers.
We’ll add more DNS records to this zone later. The next thing to do now is to create an SSL/TLS certificate to use with CloudFront using the AWS Certificate Manager.
AWS Certificate Manager
In this step, you’ll set up an SSL/TLS certificate to enforce HTTPS communication between your users and CloudFront using the AWS Certificate Manager. CloudFront is a service that speeds up the distribution of your website to users. It caches your website assets in servers closest to your users called edge locations. This results in your website delivered with the lowest latency. To create an SSL/TLS certificate using the Certificate Manager, search for it in the AWS Console and follow the steps below:
- Important: CloudFront recognises certs issued from
us-east-1only. So certificates created in AWS Certificate Manager for CloudFront must be from this region. - Change the region to us-east-1 or North Virginia
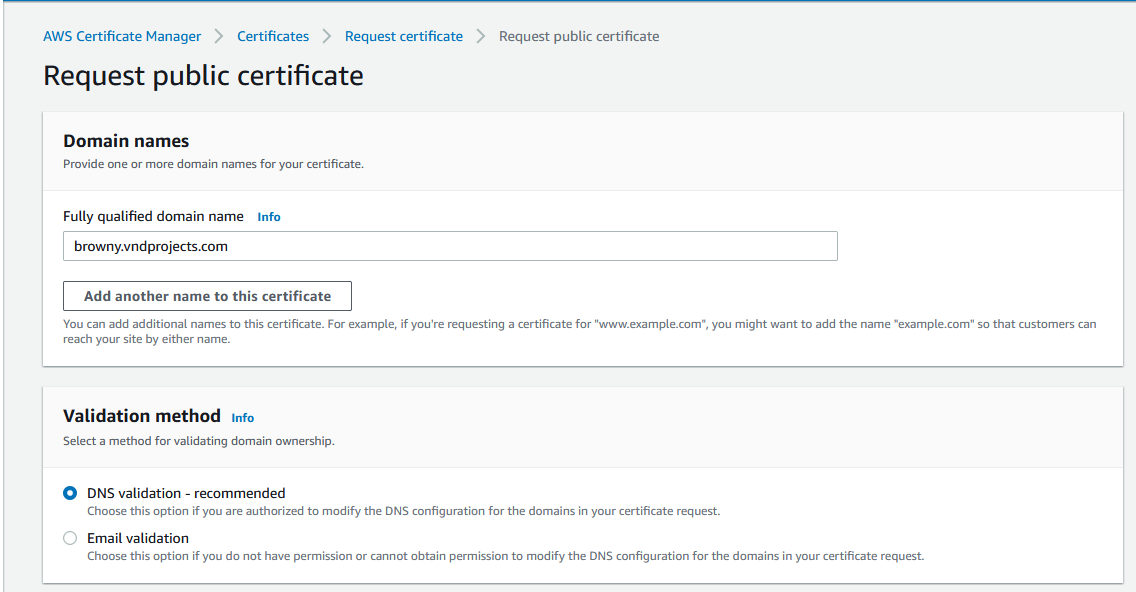
- Click on “Request a certificate” and then select “Request a public certificate“
- Fill in your domain name of your website(the custom domain name you purchased/configured in previous steps). In my case, I used a subdomain: browny.vndprojects.com.
- Choose the DNS validation method.
- Choose a Key algorithm (the default RSA 2048 is the most widely used key type).
- Click “Request” to request the certificate.
- AWS now needs to know that you own the domain you’re trying to create a certificate for, so you must validate this using DNS records.
- To link the certificate to your domain’s DNS, click the certificate’s ID and under “Domains“, click “Create records in Route 53“
- Next, click “Create Records”.
- AWS will issue the certificate and create DNS records to link your domain to it. This process takes roughly 30 minutes to complete.
The final part of setting up a website is to create an AWS CloudFront Distribution.
AWS CloudFront Distribution
This section explains the process of linking your website to CloudFront, enabling you to deliver the content from your S3 bucket through CloudFront’s network. This allows you to leverage the speed and caching capabilities provided by CloudFront. Follow the steps below to create a distribution:
- Navigate to Amazon CloudFront in the Console.
- Click “Create Distribution“.
- In the Create Distribution window, choose an AWS origin. In this case, you’ll want to select the URL of your S3 bucket from the dropdown list. An origin is where CloudFront will look for your website’s content.
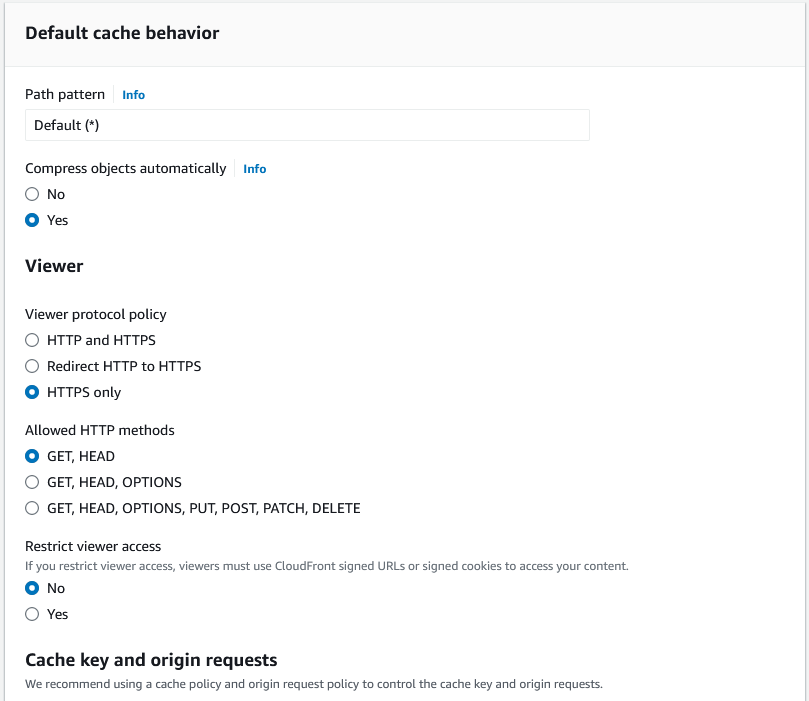
CloudFront SSL certificate
- In the Default cache behavior section, under viewer protocol policy choose redirect HTTP to HTTPS
- Scroll down to Alternate Domain Names(CNAMEs) type your domain name e.g example.com
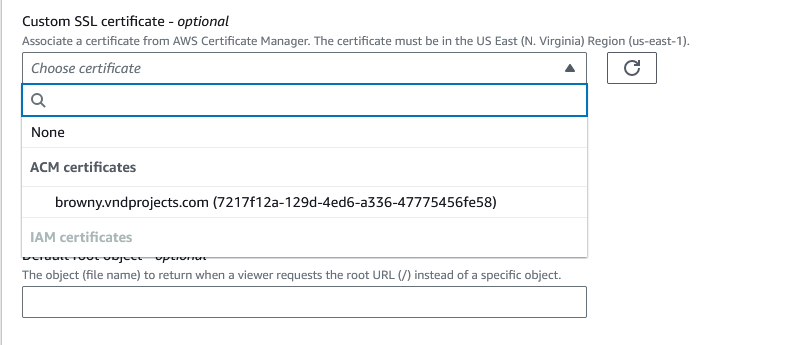
- In the custom SSL certificate section, choose the certificate you created in the previous step.
- Click Create Distribution.
- The distribution takes up to 20 minutes to provision.
- The last step is to create a record in Route 53 to redirect traffic from your domain to Cloud Front.
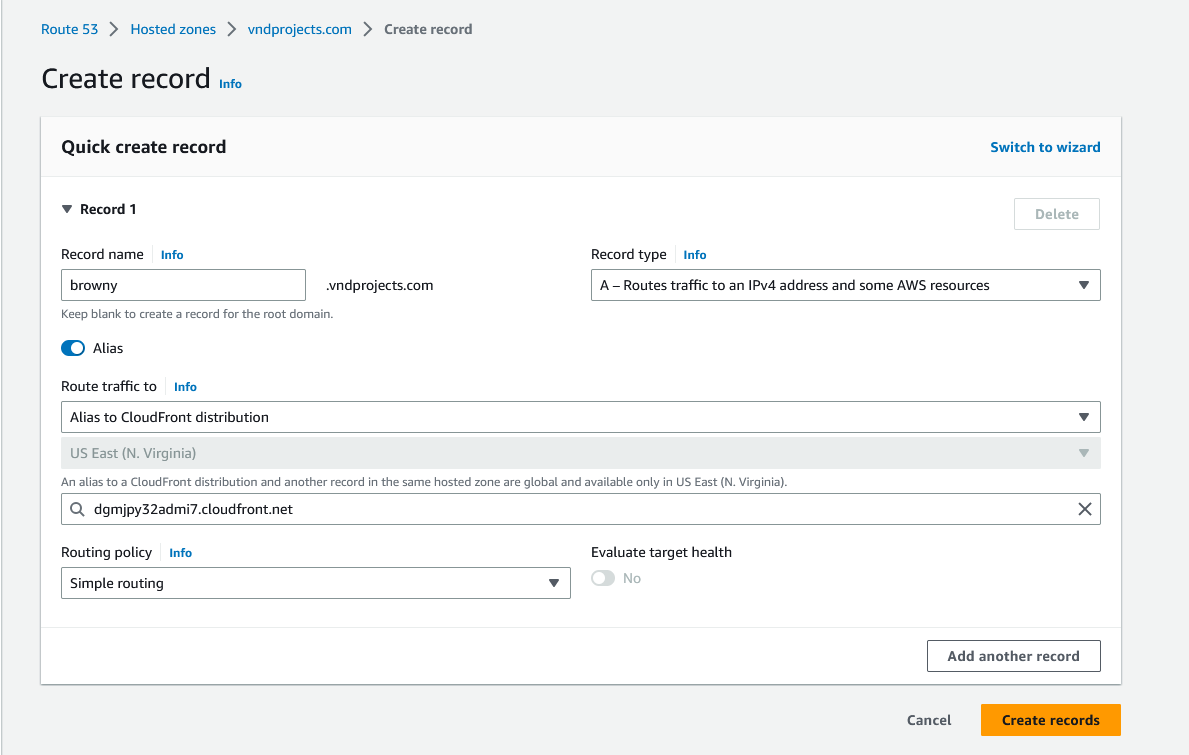
Route 53 Record
In this step, you’ll create the final piece of the puzzle; a DNS record that will redirect traffic from your domain to your CloudFront distribution.
- In Route 53, choose your hosted zone and click on “Create Record”
- Under Record type, select A and toggle the “Alias” switch on. I have to mention here that “Alias” records are not standard and are an AWS extension to DNS functionality. Aliases allow you to route traffic to AWS resources such as CloudFront or S3 buckets.
- Next, choose an endpoint. Select “Alias to CloudFront distribution”.
- In the Routing policy field, select “Simple Routing”. Simple routing is the policy you want to select when routing traffic to a single resource as we are doing here.
- Click the drop down menu below and select your distribution.
- Click “Create Records“.
Conclusion
That will do it! Give the DNS records time to propagate and update and try to load your domain name. If everything worked well, you should see your website. If not, go through the post again and see if you missed anything. In this article, you saw how to create and upload a static website to S3, give public access permissions to it, create a TLS certificate and use CloudFront to distribute your website to users around the world. You also saw how to create and edit DNS records to point your domain name to CloudFront and S3