In a previous article, I discussed four different deployment policies you can employ when deploying applications to AWS. Some of these methods include All at once, Rolling, Immutable and Blue/Green deployments. In that article I discussed the differences between these policies. In this post, I will show you how to set up Immutable and Blue/Green deployments for an application deployed using Elastic Beanstalk through the AWS console as well as using the Elastic Beanstalk CLI.
Changing deployment policy in AWS Console.
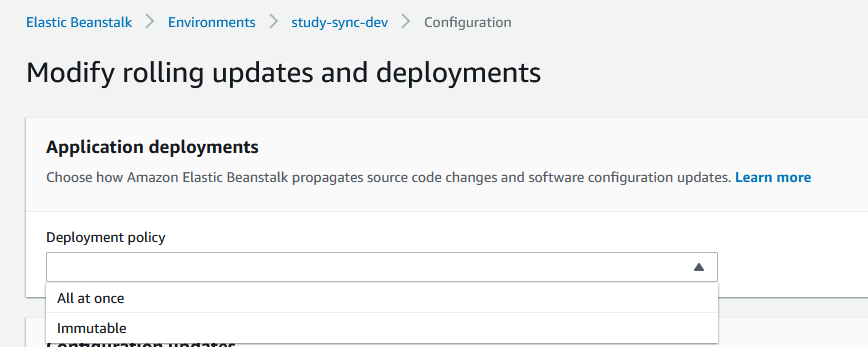
Choosing a deployment policy is relatively straight forward to do in the AWS Console. To get to deployment settings, navigate to your Elastic Beanstalk’s environment and select “Configuration”. Under Application deployments you can select either “All at once” deployment or “Immutable” deployments.
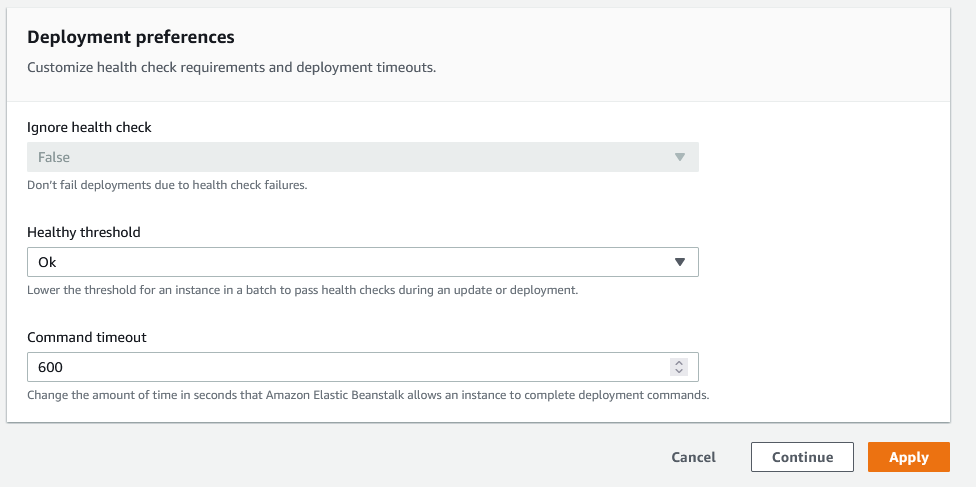
In addition to changing the deployment policy, you can also change settings related to the healthchecker:
After making this change, the next time you push code to the Elastic Beanstalk environment, the environment will be deployed using the policy you selected.
Changing deployment policy in Elastic Beanstalk CLI.
The deployment policy can be changed programmatically via the Elastic Beanstalk CLI. If you wanted to change the policy from All at once to Immutable, you would need to follow the following steps:
- install the eb cli.
- configure EB CLI on your computer.
- Once you have configured EB CLI and pointed it to your environment, create a folder called
.ebextensions
in your project root. - Create a
.configfile to the.ebextensionsfolder, you can name this file anything you like (e.g001_deployment.config) and configure the deployment policy:
options_settings:
    aws:elasticbeanstalk:command:
        DeploymentPolicy: Immutable
        HealthCheckSuccessThreshold: Warning
        IgnoreHealthCheck: true
        Timeout: "600"
The most important part of the configuration here is the DeploymentPolicy part. You can set the health checkers and other settings to whatever makes sense for your project. Save this file, commit it to version control and push it upstream. The next time you run a deployment through eb-deploy, the deployment will be an Immutable deployment.
Immutable deployments create a separate Auto Scaling Group and then launch new instances running the new version of your application in the new auto scaling group. These new instances are run alongside the instances running the old application version. Once the new instances pass health checks, the old instances are terminated. If the new instances don’t pass health checks, Elastic Beanstalk terminates them, leaving the original instances untouched. The advantage of using this deployment policy is that users never experience downtime. The disadvantage is that immutable deployments are much slower than all at once deployments.
After changing the deployment policy to “Immutable”, you should see a message like the one below during the next deployment:

Deploying using the Blue/Green deployment policy in AWS Console
Blue/Green deployments are similar to Immutable deployments in that they require the creation of a new environment.
When an application is developed and deployed to an AWS Elastic Beanstalk environment, having two separate, but identical, environments—blue and green—increases availability and reduces risk. The “Blue” environment could be the live production environment that handles user traffic and the “Green” environment could be a green or new version of the application that gets built by the CI/CD pipeline process. Once the new green version is built and has passed all checks, the URL of the Blue environment is changed and pointed to the new environment. This causes user traffic to move to the newly created instance. The old environment is kept alive in case a roll back is needed.
In essence, this deployment strategy brings up an instance with the new version of the application, runs it alongside the old one and then swaps the URL of the old instance with that of the new instance. Pointing users to the new instance means they experience no downtime.
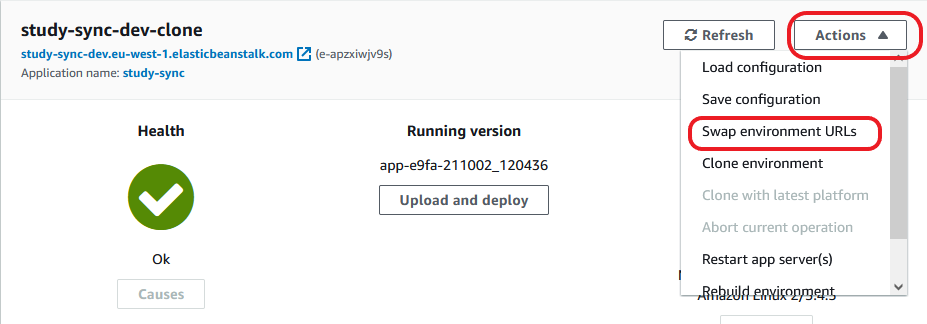
To enable Blue/Green deployments in the AWS Console, create two Elastic Beanstalk environments for your project, a main (“Blue”) environment and a secondary (“Green”) environment. Push all new code to the “Green” or secondary environment and once the new application passes health checks, navigate to one of the EB environments in the AWS Console, and in the “Actions” menu, select ” Swap environment URLs”. This will bring up a window that will allow you swap the URLs of the two environments.
Deploying using the Blue/Green deployment policy via EB CLI.
Blue/Green can be setup programmatically as well. To do it, deploy new code to the secondary environment and then in the terminal, run:eb swap <env1_name> -- destination_name <env2_name>
For example, if your main environment is called my_app_blue and the secondary environment is my_app_green, the command to swap URLs would be:eb swap my_app_blue -- destination_name my_app_green
Once you’re satisfied that the deployment was successful, you can terminate the old environment by running eb terminate:
eb terminate my_app_blue
Conclusion
This post covered how to setup Immutable and Blue/Green deployments using the AWS Console and the EB CLI. These two deployment strategies are ideal when you don’t want any downtime between deployments. Choose Immutable deployments if your application is sensitive to DNS changes and you don’t mind a relatively long running deployment. Blue/Green makes sense if you have no problem changing DNS and it is pretty fast.
Thank you for reading. If you liked this post, please subscribe to this blog using the form below or follow me on Twitter so you never miss a post.