Basic Authentication in Django
This article will cover how to add basic login and logout functionality in Django.
I assume you’re working off of a new, clean Django installation. If you’re new to Django, you may want to read this introductory post on how to get started. To begin, we will do the following:
- create a new folder for our app, I’ll name it
login_project - Activate a virtual environment and install Django in it. I’ll use pipenv
- Create a new Django project.
- Create a database.
- Fire up the Django server
. Fell free to use pip.
To do the steps above, run the following commands (or their Windows equivalent):
[sourcecode lang=”shell”]
$ mkdir login_project
$ cd login_project
$ pipenv install django
$ pipenv shell
(login_project) $ django-admin startproject django_logins .
(login_project) $ python manage.py migrate
[/sourcecode]
Your new Django installation is ready. The next step is to add the authentication. Whenever you create a new Django project, Django installs an app called auth to your project. The auth app can handle login, logout and password reset for us.
Before adding any authentication logic to your project, it is a good idea to add a new user to test the login and logout functionality:
[sourcecode lang=”shell”]
(login_project) $ python manage.py createsuperuser
[/sourcecode]
Running the createsuperuser command and going through the prompts will create a new admin user for your site. Now that you have created a user, its time to add the right logic to the project to allow login and logout.
Login URLs
Add a new entry to the urls.py file to add a route to the login and logout views:
[sourcecode lang=”python”]
from django.contrib import admin
from django.urls import path, include
urlpatterns = [
path(‘admin/’, admin.site.urls),
path(‘accounts/’, include(‘django.contrib.auth.urls’)),
]
[/sourcecode]
Here, you include the URLConf from the auth app into your project. By doing this, you add URL routes for logging in, logging out, password reset and more. For this example, I added the login URLs to the accounts path but you’re free to use any path of your choice.
Create Login Template
To login, create a login page. Django expects this page to be in registration/login.html in the templates folder. At the root level of your project, create a folder called templates and inside it, another folder called registration. Your directory structure should look like this:
[sourcecode lang=”shell”]
└── templates
└── registration
└── login.html
[/sourcecode]
In login.html add the following code to display the login form:
[sourcecode lang=”python”]
<form method="POST">
{% csrf_token %}
{{ form.as_p }}
<button type="submit">Login</button>
</form>
[/sourcecode]
This creates a Django form that will collect the username and password from the user to be sent to the server. {% csrf_token %} is a security tag to prevent cross site request forgery attacks. {{ form.as_p }} prints out the form contents as paragraphs. The last line creates a submit button.
Next, you must tell Django where to find the template you just created. Edit django_logins/settings.py and add the templates directory to the DIRS setting under TEMPLATES:
[sourcecode lang=”python”]
TEMPLATES = [
{
‘BACKEND’: ‘django.template.backends.django.DjangoTemplates’,
‘DIRS’: [‘templates’], # new
‘APP_DIRS’: True,
},
]
[/sourcecode]
At this point, you’re almost done, the login functionality is ready. Let’s fire up the server and test it out:
[sourcecode lang=”shell”]
(login_project) $ python manage.py runserver
[/sourcecode]
After starting the server, navigate to http://127.0.0.1:8000/accounts/login and you should see a page that looks something like this:

Log in using the account details of the superuser you created in step 1. What happens next might surprise you. When you enter the username and password and hit the login button, you get a “Page Not Found” error:
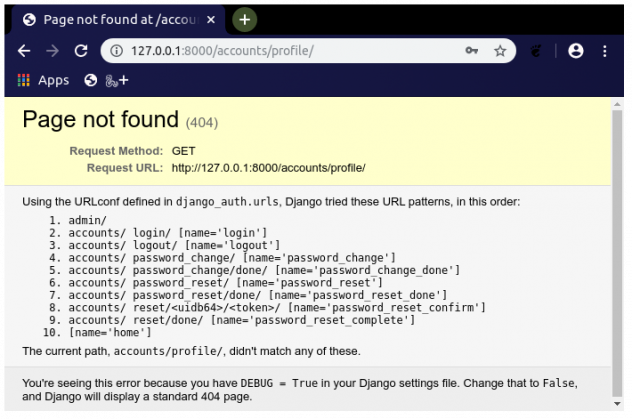
This error is actually a good thing, because it means Django was able to log you in and tried to redirect you to a default accounts/profile page, which we have not created yet. Let’s create a homepage that the user will be redirected to after a successful login. To do this, first stop the Django server by hitting Ctrl + C on your keyboard and then create two files in the root of the templates folder called ‘home.html’ and ‘base.html’. You can use any name you like for these files in your project. Your templates folder should look like this now:
[sourcecode lang=”shell”]
└── templates
├── base.html
├── home.html
└── registration
└── login.html
[/sourcecode]
The base.html file will contain the basic HTML structure that all pages in this site will share and home.html will contain the homepage HTML. Open base.html in your editor:
[sourcecode lang=”html”]
<!DOCTYPE html>
<html>
<head>
<meta charset="utf-8">
<title>{% block title %}Django Auth Tutorial{% endblock %}</title>
</head>
<body>
<main>
{% block content%}
{% endblock %}
</main>
</body>
</html>
[/sourcecode]
This is a basic HTML document with Django markup added to it. {% block title %}Django Auth Tutorial{% endblock %} sets the default page title. Anything between {% block %} and {% endblock %} tags can be populated by any page that inherits from this page. More on that in a bit. This document will serve as a blueprint or master plan of any other page we’ll create. Let’s make a home page that users will be redirected to after successful login:
[sourcecode lang=”html” gutter=”true” highlight=”2″]
{% extends ‘base.html’ %}
{% block title %}Home{% endblock %}
{% block content %}
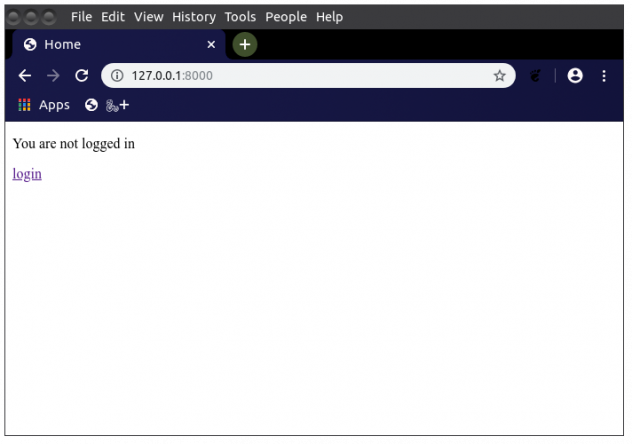
{% if user.is_authenticated %}
Hi {{user.username }}
<p><a href="{% url ‘logout’ %}">logout</a>
{% else %}
<p>You are not logged in</p>
<a href="{% url ‘login’ %}">login</a>
{% endif %}
{% endblock%}
[/sourcecode]
This page extends or inherits from base.html so we don’t need to repeat ourselves by typing out the HTML that’s already in base.html. Line 2 sets the page title to “Home” and the rest of the lines check if a user is logged in or not. If the user is logged in, a friendly message is displayed. If they are not logged in, there’ll be a link to allow them to login.
Add new URLs
The next step is to tell Django about these new pages we’ve just added. To do that, open urls.py in your editor:
[sourcecode lang=”python”]
from django.contrib import admin
from django.urls import path, include
from django.views.generic.base import TemplateView # new
urlpatterns = [
path(‘admin/’, admin.site.urls),
path(‘accounts/’, include(‘django.contrib.auth.urls’)),
path(”, TemplateView.as_view(template_name=’home.html’), name=’home’), # new
]
[/sourcecode]
This tells Django to load home.html whenever someone visits the website without specifying an endpoint. We give the URL the name home. Since home.html inherits from base.html, we don’t need to add a URL path for base.html. Now that you have a homepage, you need to tell Django to display this homepage whenever someone logs in or out. You do that by editing the settings.py file. Add the following two lines at the very bottom of the file:
[sourcecode lang=”python”]
…
LOGIN_REDIRECT_URL = ‘home’
LOGOUT_REDIRECT_URL = ‘home’
[/sourcecode]
This tells Django to redirect a user to the home page after they successfully login or logout. Start the Django server to try it out:
[sourcecode lang=”shell”]
(login_project) $ python manage.py runserver
[/sourcecode]
In your browser, go to the login link http://127.0.0.1:8000/accounts/login/ and login. You should be redirected to the home page you just created:

If you click the logout link, you’re successfully logged out and redirected to the homepage:
Conclusion
This post covered how to use Django’s built in auth app to handle logging in and out of a website. Django supports resetting your password and sign up as well. I will cover these in a future article.