The GTK+ Grid is a container that arranges its children into rows and columns in the same
way data in an Excel spreadsheet is laid out. The children can take up as many rows and columns
as they need to.
The GTK+ Grid mainly uses two methods to add child elements to it: Gtk.Grid.attach()
and Gtk.Grid.attach_next_to()
Let’s build a layout using the Grid and the attach() method:
[sourcecode lang=”python”]
import gi
gi.require_version(‘Gtk’, ‘3.0’)
from gi.repository import Gtk
class GridWindow(Gtk.Window):
def __init__(self):
Gtk.Window.__init__(self, title="Grid Example")
grid = Gtk.Grid()
self.add(grid)
button1 = Gtk.Button(label="Button 1")
button2 = Gtk.Button(label="Button 2")
button3 = Gtk.Button(label="Button 3")
# Add the first button to the grid
grid.add(button1)
# Attach subsequent buttons to the grid
# Gtk.Grid.attach(child, column, row, width, height)
grid.attach(button2, 1, 0, 1, 1)
grid.attach(button3, 2, 0, 1, 1)
win = GridWindow()
win.connect("delete-event", Gtk.main_quit)
win.show_all()
Gtk.main()
[/sourcecode]
The Gtk.Grid.attach() method takes 5 parameters:
- Child — The widget to be added
- Left or Column –The column number to attach Child to
- Top or Row — The row number to attach the Child to
- Width –The number of columns that the child should take up
- Height –The number of rows the child will take up
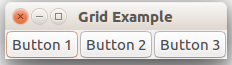
In the code example above, we created a grid layout with three buttons in a single row.
The buttons were each placed in a single column and took up only one row. Grid layouts allow us to position elements easily. Coordinates in the GTK+ Grid system start at 0, which means that position 0 refers to the first position and position 1 refers to the second position. Let’s add a second row to the layout to make this clear:
[sourcecode lang=”python”]
import gi
gi.require_version(‘Gtk’, ‘3.0’)
from gi.repository import Gtk
class GridWindow(Gtk.Window):
def __init__(self):
Gtk.Window.__init__(self, title="Grid Example")
grid = Gtk.Grid()
self.add(grid)
button1 = Gtk.Button(label="Button 1")
button2 = Gtk.Button(label="Button 2")
button3 = Gtk.Button(label="Button 3")
button4 = Gtk.Button(label="Button 4")
# Add the first button to the grid
grid.add(button1)
# Attach subsequent buttons to the grid
# Gtk.Grid.attach(child, column, row, width, height)
grid.attach(button2, 1, 0, 1, 1)
grid.attach(button3, 2, 0, 1, 1)
grid.attach(button4, 1, 1, 1, 1)
win = GridWindow()
win.connect("delete-event", Gtk.main_quit)
win.show_all()
Gtk.main()
[/sourcecode]
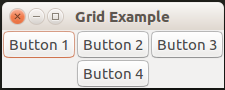
In the example above, we added a fourth button to the grid and positioned it in column 1 and row 1.Since position 0 represents the first position and one represents the second position, the button was placed in the second row in the second column.
The GTK+ Grid is flexible, it also allows you to position elements relative to other elements already in the grid. This is done through the Gtk.Grid.attach_next_to() function. Take a look at this example:
[sourcecode lang=”python”]
import gi
gi.require_version(‘Gtk’, ‘3.0’)
from gi.repository import Gtk
class GridWindow(Gtk.Window):
def __init__(self):
Gtk.Window.__init__(self, title="Grid Example")
grid = Gtk.Grid()
self.add(grid)
button1 = Gtk.Button(label="Button 1")
button2 = Gtk.Button(label="Button 2")
button3 = Gtk.Button(label="Button 3")
button4 = Gtk.Button(label="Button 4")
button5 = Gtk.Button(label="Button 5")
button6 = Gtk.Button(label="Button 6")
button7 = Gtk.Button(label="Button 7")
# Add the first button to the grid
grid.add(button1)
# Attach subsequent buttons to the grid
# Gtk.Grid.attach(child, column, row, width, height)
grid.attach(button2, 1, 0, 1, 1)
grid.attach_next_to(button3, button1, Gtk.PositionType.BOTTOM, 1, 2)
grid.attach_next_to(button4, button3, Gtk.PositionType.RIGHT, 2, 1)
grid.attach(button5, 1, 2, 1, 1)
grid.attach_next_to(button6, button5, Gtk.PositionType.RIGHT, 1, 1)
grid.attach(button7, 0, 3, 3, 1)
win = GridWindow()
win.connect("delete-event", Gtk.main_quit)
win.show_all()
Gtk.main()
[/sourcecode]
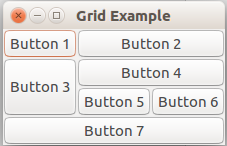
attach_next_to() allows you to attach a child element next to another and specify where it will be positioned in relation to that element using GTK’s PositionType statement. In the code above we adjusted the width and height of some of the buttons to make them take up more than one row or column.