
Introduction
Have you ever wondered how to host a website in your home network? It’s pretty straightforward, I’ll show you how.
Step 0: Purchase a domain
Purchase a domain from your favourite domain registrar. You can get domains from registrars like Cloudflare, Namecheap and Name.co.zw (for .co.zw domains).
Step 1: Linux Server Set Up
While you can run a web application from your personal computer its better to use a dedicated always-on server in your network. For simple applications, you don’t need to buy expensive hardware; a Raspberry Pi or an old laptop or PC can act as your web server.
For low-resource environments, I recommend using Linux for the server OS. For Raspberry Pi, you can use Raspberry Pi OS and for an old laptop, consider installing a light-weight Linux distro like Ubuntu Server. Ensure your server has a static IP address within your local network. Set up a static IP by setting it in /etc/netplan for [[Create Static IP Ubuntu|Ubuntu/Debian]] or /etc/dhcpcd.conf in [[Create Static IP on Rasperry Pi OS|Raspberry Pi OS]].
To secure your server, disable root login and enable the UFW firewall and set it to only allow SSH and traffic on ports 80 and 443.
Disable Root login
sudo nano /etc/ssh/sshd_config
Set PermitRootLogin no, then restart SSH
sudo systemctl restart ssh
Enable UFW Firewall
sudo ufw allow OpenSSH
sudo ufw allow 80/tcp
sudo ufw allow 443/tcp
sudo ufw enable
Step 2: Install a Web Server
Depending on your web application, install a suitable web server.
For Nginx:
sudo apt update && sudo apt install nginx -y
For Apache:
sudo apt update && sudo apt install apache2 -y
I prefer Nginx, so my examples will use nginx going forward.
Run the command below to configure nginx to start automatically on boot:
sudo systemctl enable nginx
sudo systemctl start nginx
Step 3: Configure Reverse Proxy
We’ll use Nginx as our reverse proxy. Reverse proxies like Nginx listen for HTTP requests on ports 80 and 443 and route them to your application. Start your web app in the Linux server and note it’s port.
Next, create a configuration file for your web application in the Nginx sites-available directory replacing demoapp with your app’s name:
sudo nano /etc/nginx/sites-available/demoapp
Configure Nginx to route or proxy traffic to your app. Replace your_domain.com with your domain and your_local_ip and port with the IP address and port your web application is running on:
server {
    listen 80;
    server_name your_domain.com;

    location / {
        proxy_pass http://your_local_ip:port; # Change to your app's IP:Port
        proxy_set_header Host $host;
        proxy_set_header X-Real-IP $remote_addr;
        proxy_set_header X-Forwarded-For $proxy_add_x_forwarded_for;
        proxy_set_header X-Forwarded-Proto $scheme;
    }
}
Enable the site and restart nginx:
sudo ln -s /etc/nginx/sites-available/demoapp /etc/nginx/sites-enabled/
sudo systemctl restart nginx
Step 4: Configure Port-Forwarding On Your Router
To reach the web server from the internet, you will need to open ports on your router and forward them to the server. Enabling port forwarding on a router is device-specific, checkout this article to find out how to do it for the common router brands.
You’ll want to forward TCP traffic on ports 80 and 443 on the router to port 80 and 443 respectively on your server’s IP.
Step 5: Set Up Dynamic DNS
You can skip this section if you have a static public IP address. If you’re not sure whether or not you have one, you probably don’t and this section likely applies to you.
In order to reach your application, you need to create DNS records that point your domain to your network’s public IP address. DNS is the internet’s phonebook, it’s used to lookup domain names like example.com and match them to IP addresses.
To find out what your public IP address is visit https://icanhazip.com/ in your browser. The IP address you see is the public IP address temporarily assigned to you by your ISP. When you restart your router, this IP address may change.
Since your home IP will likely change, you’ll need to use a Dynamic DNS service that will keep track of your public IP and ensure that your domain name always points to it. Free Dynamic DNS services you can try are NoIP.com, DuckDNS or the Cloudflare Dynamic DNS service if you’re already using Cloudflare for DNS.
Now, whenever a visitor visits your domain, the Dynamic DNS service will point them to your router’s IP address, the router will in turn forward the request to your server. Congratulations, your app is online!
Step 6: Set Up Cloudflare DNS (Optional)
The downside of the previous method is that while simple to set up, it exposes your home IP address to the world, which is something you might not like. To add extra protection to your site and avoid leaking your home IP, consider proxying your DNS through Cloudflare.
Proxying DNS through Cloudflare makes all DNS requests for your domain resolve to Cloudflare IP addresses first and be forwarded from Cloudflare servers to your home IP address. This has the benefit of keeping your home IP address private, protecting you from denial of service attacks, and provides caching and automatic free HTTPS certificates.
To set up DNS proxying for your domain, login to the Cloudflare DNS dashboard and create a CNAME record that points your domain name to the Dynamic DNS hostname you got in the previous step. The CNAME record instructs Cloudflare to retrieve your home IP address from the Dynamic DNS service.
Refer to the Cloudflare Docs to learn how to Proxy DNS Records.
Step 7: Enforce TLS (HTTPS) on your domain
To enable automatic HTTPS on your domain, enable the “Always Use HTTPS” setting in the Cloudflare SSl/TLS settings.
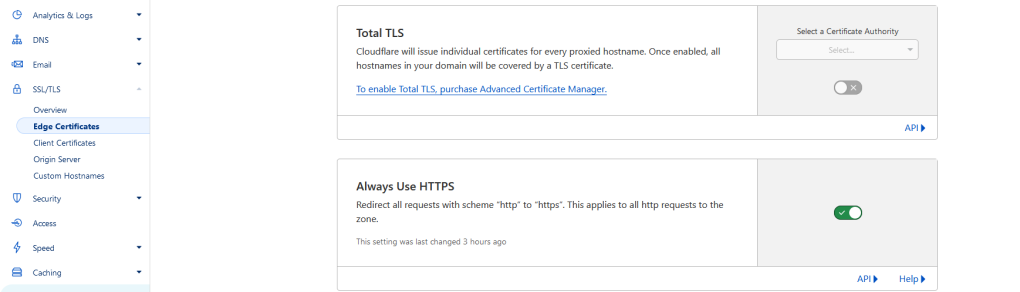
Now, all requests to your app will use HTTPS!
Conclusion
Self hosting a web application is a fun exercise that gives you full control over your setup while keeping costs low. After following these steps, you’ve set up a Linux-based server, configured a reverse proxy with Nginx, secured your domain with Cloudflare, and ensured reliable access with Dynamic DNS.
If you’re on a network that uses CGNAT, the steps above likely won’t work for you. I’ll post an article on how to go around CGNAT in the future.