Automating DevOps with BitBucket Pipelines Series Navigation
- Setting Up Repositories and CICD in BitBucket
- Configuring Triggers and Branch Protection Rules
- Setting Up Deployment Servers (This Article)
Introduction
This is the third post in my DevOps with BitBucket series. In this post, I’ll show you how to set up a deployment server for Continuous Delivery (CD) with BitBucket.
In the last two articles, I covered setting up Continuous Integration (CI) in BitBucket. Now let’s focus on the Continuous Delivery (CD) aspect of CI/CD.
Understanding Continuous Delivery vs. Continuous Deployment
CD can stand for Continuous Deployment or Continuous Delivery.
- Continuous Delivery: Ensures that code is always in a deployable state. The code is automatically built, tested and prepared for release but requires sign-off before deployment to production.
- Continuous Deployment: the code is automatically deployed to production without manual intervention.
I’ll focus on Continuous Delivery in this post. I prefer it because it’s a safe way to deploy changes to production servers especially if the failure of the deployment would significantly impact users. Requiring a manual check allows teams to ensure everything works as expected, especially for things not covered by unit tests.
Choosing a Deployment Server
How and where you deploy code to a server depends on your infrastructure needs. You might deploy to:
- Cloud platforms like AWS, Azure or Google Cloud
- Platform-as-a-service(PaaS) providers such as Heroku or Render
- On-premises servers or Virtual Private Servers( VPS)
In this post, I’ll show you how to set up a minimal VPS or Virtual Machine for deployments. A VPS or Virtual Machine is generally cheaper than other options and gives you more control than PaaS solutions, making it a good choice for custom deployments.
Preparing your Server for Deployment
There are a few preliminary steps you must take before your server is ready for deployments. First, you need a secure way to connect to it, using a protocol like SSH. Next you want to install the tools or runtimes or dependencies required to run your application. Lastly, you may want to set up user accounts to run your services.
SSH Configuration
Secure Shell or SSH is the standard way to connect securely to a remote server. If it isn’t already installed on the server, install and configure it using the instructions below:
1. Update package lists and install the openssh-server package.
# Refresh local package list
sudo apt update

# Install OpenSSH Server
sudo apt install openssh-server
2. Start and enable the SSH Service
Run the following to start the SSH service and set it up so it runs automatically when the server boots up
sudo systemctl start ssh
sudo systemctl enable ssh

# Verify that it is running
sudo systemctl status ssh
3. Configure a Firewall
If you have a firewall enabled, configure it to allow SSH traffic. Additionally, for improved security, consider changing the default SSH port, disabling password authentication and disabling root access via SSH.
Dependency installation
Install any build tools or run time environments your project needs. This could include a Web server like Nginx, a container runtime like Docker or language-specific tools like Python, NodeJS and .NET.
Create application server user accounts
Where possible, avoid running applications as root user. It is a good idea to create a non privileged user account to run your applications. Here’s how to create user account called app_admin in Linux. Run the following command to create a user for running the application:
# create application user
useradd --create-home --shell /usr/bin/bash app_admin

# Set/change a password for the newly created user
sudo passwd app_admin
If the user account requires sudo priviledges, add them to to sudoers group:
# Add the user to the sudoers group to allow them to perform administrative functions
sudo usermod -aG sudo app_admin
If your deployment scripts require sudo privileges for managing services or modifying system directories such as /etc/nginx or /etc/systemd, you can configure passwordless sudo. However, it’s best to restrict access to only necessary commands for security reasons.
To give the app_admin user permissions to run a specific command without a password prompt:
# Edit the sudoers file
sudo visudo

# Add the following lines
app_admin ALL=(ALL) NOPASSWD:/usr/bin/systemctl start example-service.service
app_admin ALL=(ALL) NOPASSWD:/usr/bin/systemctl stop example-service.service

# save and exit
To allow running all sudo commands without a password prompt:
# Edit the sudoers file
sudo visudo

# Add the following line
app_admin ALL=(ALL) NOPASSWD:ALL

# save and exit
Configuring Deployment Environments in BitBucket Pipelines
To allow BitBucket to deploy or push code to the server, it needs an SSH key to securely connect and authenticate to the server. You can generate one in the BitBucket menu or supply one you’ve already created.
Add Bitbucket SSH key to VPS
To generate a new SSH key in BitBuckets, follow these steps:
- Navigate to the repo you wish to deploy
- Go to “Repository Settings” > SSH Keys > Generate SSH Keys
- Add the VPS’s IP address to “Known Hosts Field” to generate a fingerprint for it. This tells Bitbucket to expect connections to this host.
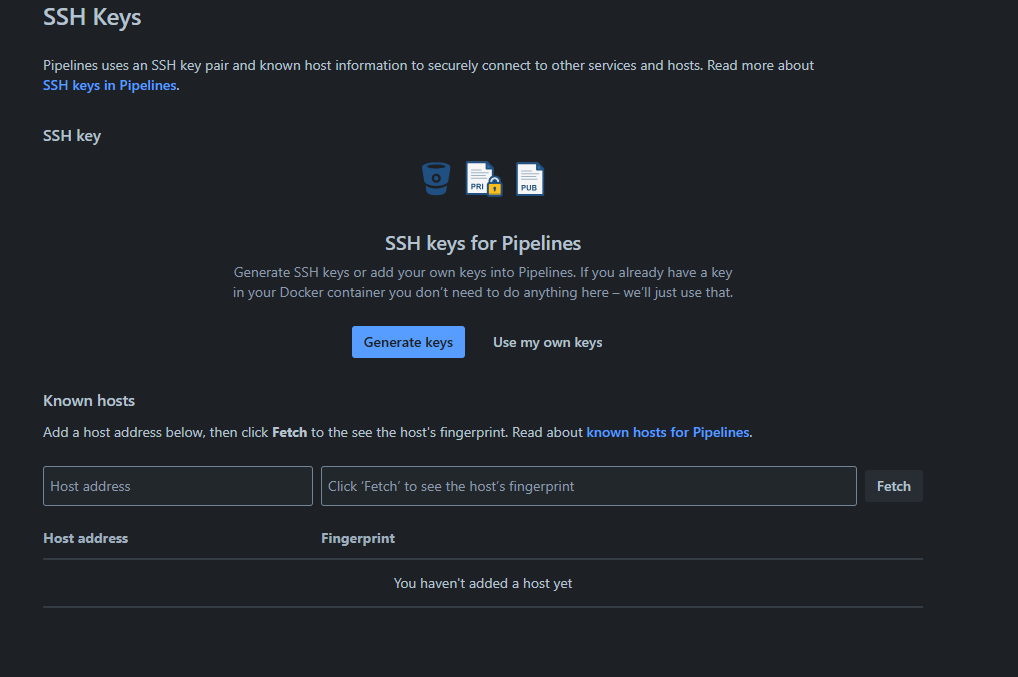
After that, add the hosts key and generate keys:
- Fetch the Hosts fingerprint and click “Add hosts once the fingerprint is populated”
- Click “Generate keys” to generate a new Key Pair if one doesn’t already exist.
- Copy the public key to
.ssh/authorized_keysin the deployment server.
Allow the VPS server to connect to BitBucket via SSH
If your server will clone code from a BitBucket repository via SSH, BitBucket must be configured to allow SSH connections from it. To set this up, create an SSH key-pair on the server and share the server’s Public Key with BitBucket:
# Generate keys if you don't already have one
# The text after the -C is for a comment. Use a descriptive comment like your email address or server name
ssh-keygen -t ed25519 -C "your_email@domain.com"

# Copy the contents of /home/app_admin/.ssh/id_ed25519.pub
- In BitBucket, add the Server’s Public SSH key to the list of Keys under Settings > Account Settings > SSH Keys
- Click “Add Key”

- Paste in the public key you copied from your server.
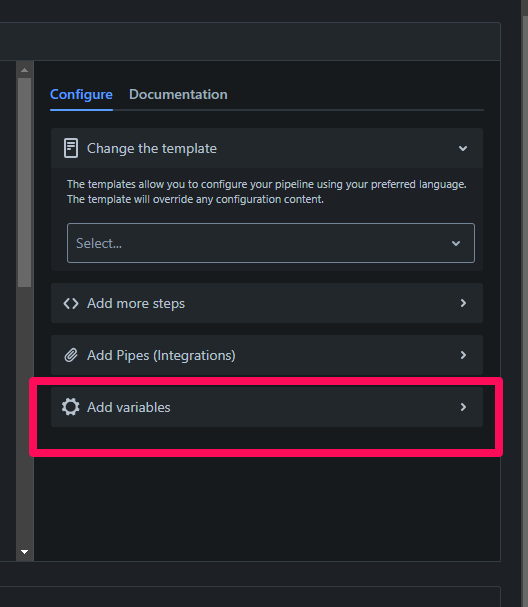
Environment variables and secrets
If your application requires secrets or environment variables, you can set them up in the BitBucket Deployments menu. With environment variables, you can add deployment specific configuration information such as API Keys, server IP addresses or other information required to run your application.
To add environment variables to BitBucket, navigate to Repositories > Deployments > Configure. In the Configure section, click “Add variables”
Setting Up Deployment Scripts in Pipelines
Once code changes have been verified, built and tested, the BitBucket pipeline can deploy the new code to the server in a number of ways, depending on the environment and the application. The pipeline can transfer code using a tool like scp or rsync over SSH to the remote server or it can connect to the remote server over SSH and execute commands remotely on the server. This can include starting or stopping web or application servers.
I’ll the next two posts, I’ll cover how to set up scripts to automatically pull code changes and deploy Python and Flutter projects.
Conclusion
This post walked through setting up a Linux server for deployments using BitBucket. It covered creating SSH keys, application user accounts and how to set up environment variables in BitBucket. In the next articles, I’ll cover deploying specific software stacks.